Connecting to Windows Terminal Servers
1. As of 01/01/21, off-campus users must connect their local system to the Husky On-Net VPN.
Non-UW members, see: Connecting to CSDE’s HON-D Departmental VPN
2. Locate and select Remote Desktop Connection.

In Windows 8 and later, it is in Start -> All Programs -> Window Accessories.
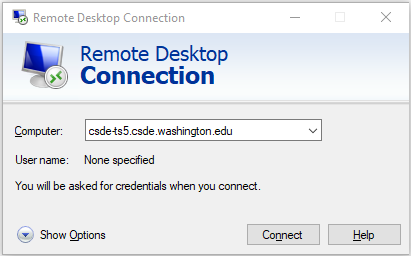
3. Once prompted with a window similar to below, type in the terminal server name of choice where it says Computer (e.g., “csde-ts2.csde.washington.edu”).
NOTE: Students should use csde-TS4 and csde-TS5. All other users should use csde-TS1, or csde-TS2. See Choosing A Terminal Server for details.
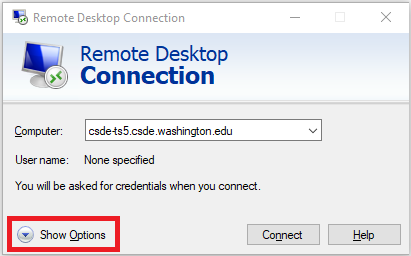
4. Click Show Options.
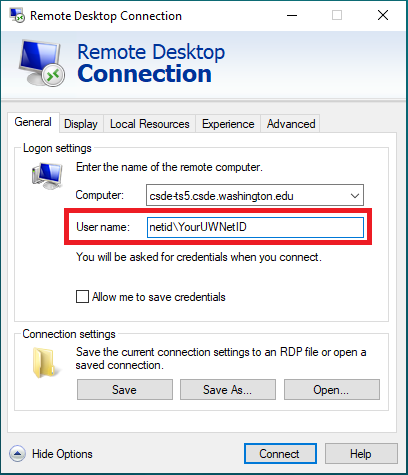
5. In the User name field, type netid\your-username.
For example, if your NetID is “godawgs”, then your username should be netid\godawgs.
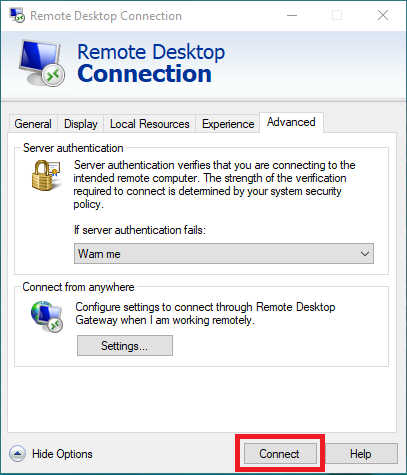
6. Next, select the Advanced tab.

7. Click the Settings button.
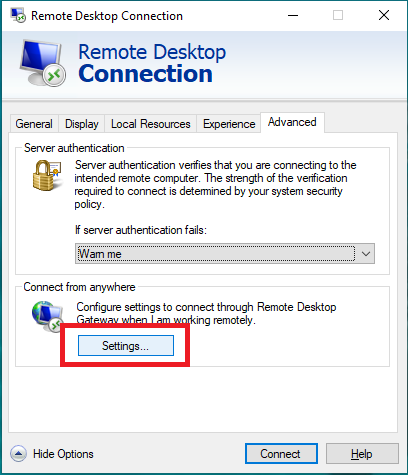
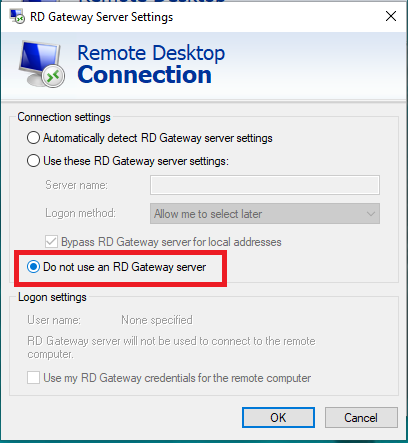
8. Choose the Do not use an RD Gateway server radio button, then select OK.
9. After selecting OK, you will be brought back to the Advanced window. Press Connect.
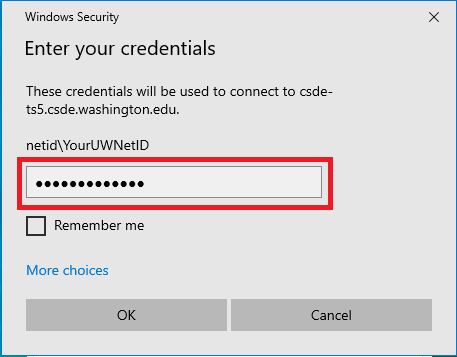
10. Finally, enter your UW NetID password.
You should now be successfully logged on to a terminal server. If you are having logon problems after following the above instructions, please see our troubleshooting suggestions below.
To logout of your session, double-click the “Logout” icon on the remote desktop screen.
1. As of 01/01/21, off-campus users must connect their local system to the Husky On-Net VPN.
Note: The VPN client is currently only available for MacOS 13 and newer.
Non-UW members, see: Connecting to CSDE’s HON-D Departmental VPN
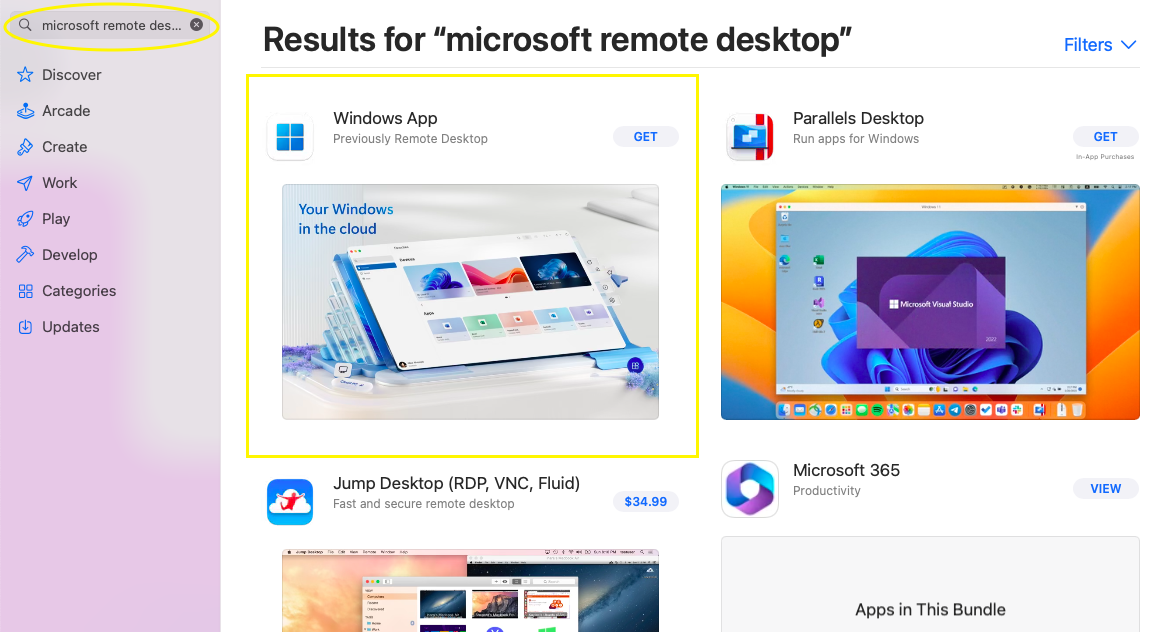
2. Download and install the Windows App from the Mac App Store.
- If Windows App fails to install, go to the app store and install available updates then restart the computer. The latest version of Windows App is version 11.0.5.
3. Find and open Windows App
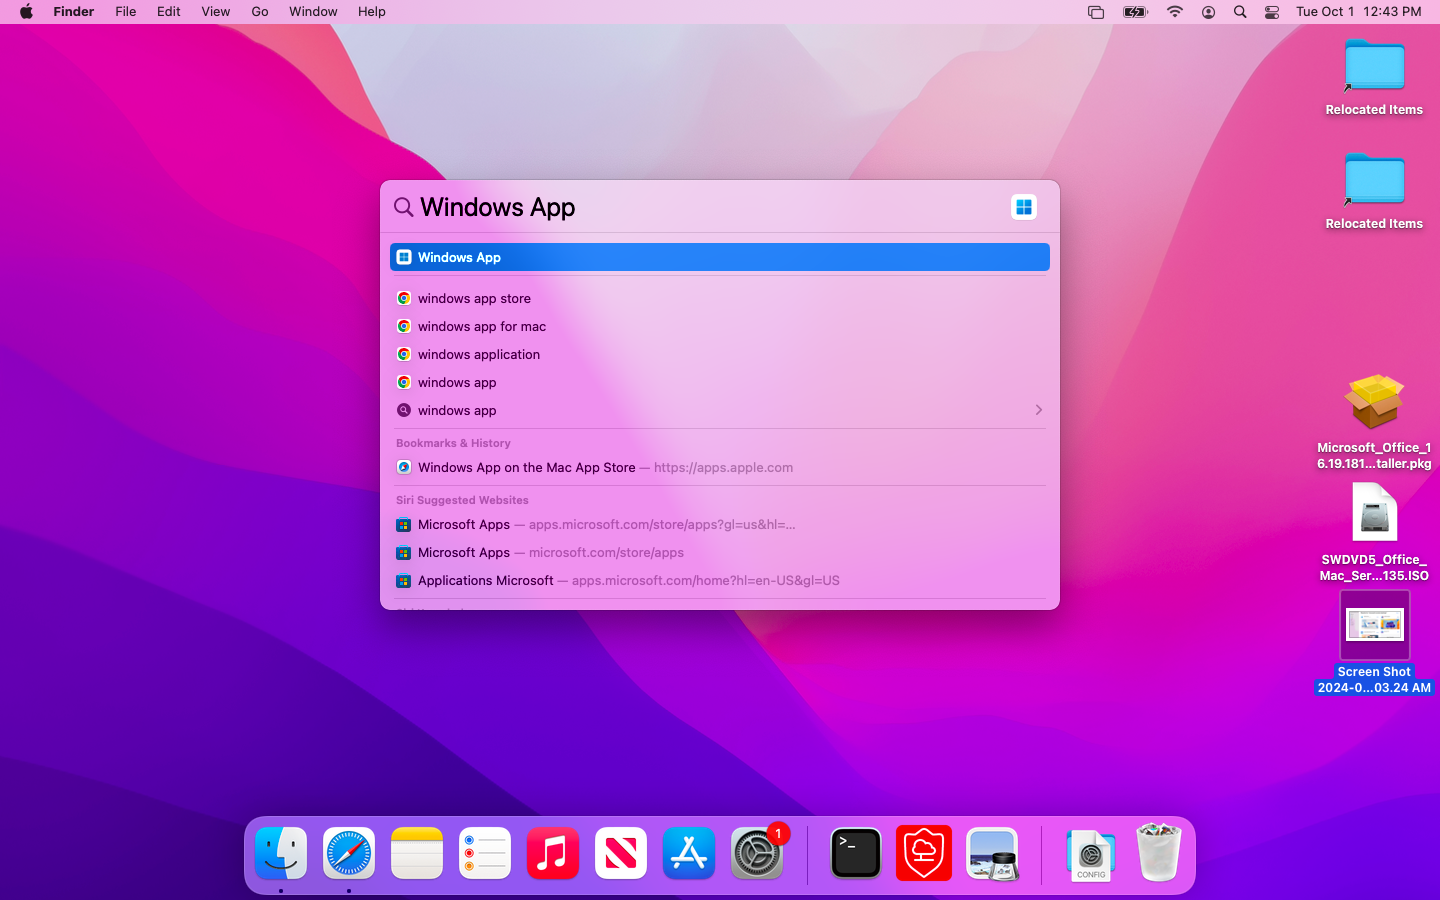
4. Once opened, Windows App will show a window like the one below. Click the + icon in the top right corner of the window and select the ‘Add PC’ Option.

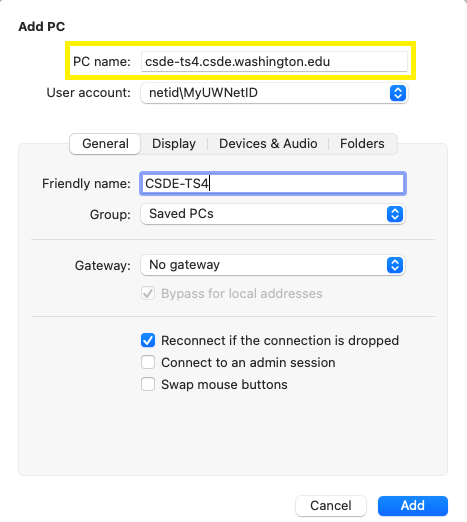
5. The window below will appear. Enter the following details:
a. The PC name/server (e.g., csde-ts4.csde.washington.edu).
NOTE: Students must use csde-TS4 or csde-TS5.
All other users should use csde-TS1 or csde-TS2.
See Choosing A Terminal Server for details.
b. User Account (optional) – If you use the terminal servers often on a personal device and would like your username and password to auto-populate, you can choose ‘Add User Account’ here. In the Username field, type netid\your-username and click Connect. For example, if your NetID is “godawgs”, then your username should be netid\godawgs. Note the use of the backslash! We do not recommend a friendly name associated to your user account.
c. Friendly Name (optional) – Useful if you use more than one server. Example: CSDE TS4
d. Click ‘Add’ in the lower right corner of the window.
The window should now look similar to below.
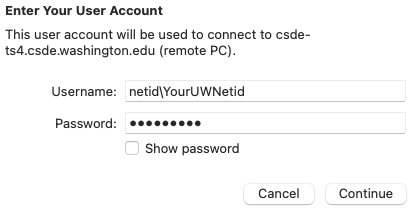
6. Windows App will then update the connections list, which should look similar to the image below. Double-click your new connection.

- If you do not see your UW NetID, you will be prompted for your NetID and password. In the username field, type
netid\YourUWNetIDand click Connect. For example, if your NetID is “godawgs”, then your username should be netid\godawgs.Note the use of the backslash!
7. You should now be successfully logged on to a terminal server, and your screen should look similar to the one below. If you are having logon problems after following the above instructions, please see our troubleshooting suggestions below.
Your local computer can be accessed if you minimize the Windows App window by hovering your mouse at the top of your screen.
To logout of your terminal server session, double-click the “Logout” icon on the remote desktop screen.

1. As of 01/01/21, off-campus users must connect their local system to the Husky On-Net VPN.
Faculty, staff, and students, see: Set up Husky On-Net VPN.
Non-UW members, see: Connecting to CSDE’s HON-D Departmental VPN
2.There are a variety of remote desktop terminal server clients available for Linux that work with RDP (Remote Desktop Protocol). They often come pre-installed on systems. CSDE recommends “Remmina” as of 10/2020
Remmina Remote Desktop Viewer for linux desktops.
To install, open a terminal and type sudo apt-get remmina or sudo yum install remmina. If that does not work, then enable the Nux-Desktop repo1 RPM.
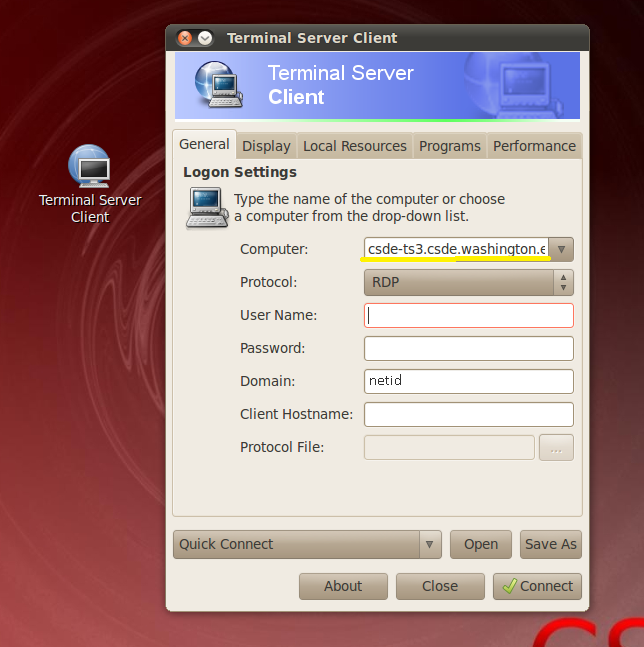
3. Open the program by navigating to it in Applications or typing its name in a terminal.
4. For computer, type in the full path. (For example, type “csde-ts3.csde.washington.edu” for terminal server
NOTE: Students who obtained a CSDE account after Sept. 4, 2020 must use csde-TS4. All other users should use csde-TS1, csde-TS2, or csde-TS3. See Choosing A Terminal Server for details.
5. Make sure protocol is set to RDP. Enter NETID credentials into the User Name and Password fields, and set the domain to NETID. Click Connect when finished.
You should now be successfully logged on to a terminal server. If you are having logon problems after following the above instructions, please see our troubleshooting suggestions below.
To logout of your session, double-click the “Logout” icon on the remote desktop screen.
Footnotes
Read through these suggestions about how to troubleshoot your problem.
- As of July 1, 2021, all student users must use csde-TS4.csde.washington.edu or csde-TS5.csde.washington.edu. You may no longer be eligible to use CSDE Windows terminal servers TS1, or TS2.
- Have you downloaded Husky OnNet and connected to the UW network? As of 01/01/21, off-campus users must connect their local system to the Husky On-Net VPN. You can find a download link with installation and connection instructions from UW-IT here.
- Are you receiving a user account expired notification when attempting to logon? If so, you must change your NetID password before you can logon.
- Are you using a wifi extender? Try disconnecting from the extender and see if you can logon with your regular wifi connection or other internet connection. If you can logon to our servers after disconnecting from the extender, then you should contact vendor support for your wifi extender for assistance. There might be a setting they can help you troubleshoot that’s preventing you from being allowed to use RDC.
- Are you including
netid\before your UW NetID as your username? Be sure you are using a backslash, and not a forward slash! For example, if your UW NetID was “godawgs”, then your username should benetid\godawgs. - Do you have a CSDE Windows account? If not, please apply for an account.
- Try following along with a video example. Note that you must already have the Husky OnNet client installed. Videos do not include audio.
If you are still unable to connect, please send an email describing your problem (preferably with screenshots) to: csde_help@uw.edu.
Accessing Files
NOTE: CSDE Computing only supports Windows 10 and newer PCs to directly map our network shares. If you are using Windows 8 or below and need to map a CSDE drive, please contact us at csde_help@uw.edu.
Mapping a CSDE drive works best from on campus. It can be done from off campus using Husky OnNet VPN, but this is not suggested as a long-term solution — the drives will give an error message anytime they are unable to make a connection. The preferred off-campus method of reaching files is through Remote Desktop and Windows Terminal Server (see Connecting to Windows Terminal Servers above).
Many campus workstations already have drives mapped automatically. On those that do not, follow the steps below to access them.
Windows
1. Open File Explorer.
a. On Windows 8 and later, it can be found at Start -> (All) Programs -> Windows System -> File Explorer.
2. Open Map Network Drive.
a. On Windows 8 and later, click on This PC in the left navigation pane. Then click on Computer -> Map network drive on the top menu bar.
![[Map Network Drive image]](/wp-content/uploads/2016/08/mapping_netdrive2_1.jpg)
3. Choose a drive Letter from the the drop-down selection.
a. Choose any drive letter; however, to avoid confusion, we suggest CSDE’s standards (H:, R:, and T: or Z:) if possible.
4. In the Folder field, type the path to the resource. Below are the full network paths for the H:, R:, and T: drives. Note that staff and faculty home directories are stored on FS1.
| Drive | Folder |
| H: | \\netid.washington.edu\csde\homes\user1\username (faculty or staff) |
| H: | \\udrive.uw.edu\udrive (for student accounts holders) |
| O: | \\netid.washington.edu\csde\shares\office\csde_office |
| R: | \\netid.washington.edu\csde\net (If you encounter a problem mapping this drive, please contact us at csde_help@uw.edu) |
| T: | \\netid.washington.edu\csde\shares\transfer |
| G: | \\netid.washington.edu\csde\shares\GIS |
5. Click Connect using different credentials. In the box that pops up, type “NetID\” and your UW NetID username. Click OK. NOTE: The Reconnect at sign-in field tells Windows to reconnect to the CSDE drive on login, and it also stores the encrypted NetID password on the computer. If the computer is used by multiple users with the same login credentials, uncheck this box to protect CSDE files from unauthorized access.
![[Connect As image]](/wp-content/uploads/2016/08/mapping_connectas1.jpg)
6. Click Finish to map the network drive using the provided information. If all goes well, the contents of the H: or T: drive will be displayed on the screen. To disconnect the network drive when finished, simply right-click and select Disconnect Network Drive.
![[Disconnect Network Drive image]](/wp-content/uploads/2016/08/mapping_disconnect1_2.jpg)
Mac
1. Click Finder -> Go -> Connect to Server.
2. In the address field, type “smb://” followed by the fully qualified domain name of the file server to connect to. (For example, type “smb://udrive.uw.edu/udrive” to access u-drive directory.)
3. Log in with your NetID username and password (in the format of “NetID\username”).
4. Go to Finder and see “udrive.uw.edu/udrive” under the Shared tab. The drive will be mounted until ejected or until the user logs out.
Here is a list of drive letters and their corresponding server names:
| Drive | Folder |
| H: | netid.washington.edu/csde/homes/user1/username (faculty and staff) |
| H: | udrive.uw.edu/udrive (for student account holders) |
| O: | netid.washington.edu/csde/shares/office/csde_office |
| R: | netid.washington.edu/csde/shares/net |
| T: | netid.washington.edu/csde/shares/transfer |
| G: | netid.washington.edu/csde/shares/GIS |
There are three recommended software options for transferring files via SFTP (ssh-based, port 22, UW VPN connection required).
- WinSCP
An industry standard and favorite. Has install version as well as portable executable. Available for Windows only. - CyberDuck
Another industry standard and favorite. Available for Windows (Download installer) and Mac (via App store). - Putty SFTP
Choose this option if you cannot install software (e.g., if you are using a public computer lab or someone else’s computer). However, this is a command-line tool and lacks a graphical interface.
As of 01/01/21, to connect to CSDE file server resources with SFTP, you must first connect to the UW’s VPN service “Husky On Net”.
Non-UW members, see: Connecting to CSDE’s HON-D Departmental VPN
Also, you must know the server and path that correspond to the drive you are using. The table below explains how to reference the server and file paths for various CSDE drives. Also, note the following:
-
- Always connect on Port #22. (SFTP uses the same port number as SSH.)
- The paths to use for SFTP are not the same as those used for mapping the drive.
Username: netid\your_netid (On U-drive, just use netid)
Port: 22
Drive   Host Server to SFTP/connect to      Folder
-----   ----------------------------       -------
H:  csde-fs1.csde.washington.edu       users\facultyusername or users\staffusername
H:  sftp.udrive.uw.edu                 studentusername (student account holders)
                                           *do not prefix username with "netid\ "*
H:  csde-fs1.csde.washington.edu     csde-fellows (most CSDE trainees/fellows**)
O:  csde-fs1.csde.washington.edu     office
R:  csde-fs1.csde.washington.edu     net (contains Project and Data)
T:  csde-fs1.csde.washington.edu     transfer
Unix Home Directory:
    union.csde.washington.edu     Unixhome
To use SFTP on a Unix computer use, the sftp command to connect to the server. For more information about using SFTP on Unix, refer to its manual page by typing man sftp. In addition, you may use SFTP to connect to any CSDE Unix server. A list is available here.
Connecting with WinSCp
1. As of 01/01/21, off-campus users must connect their local system to the Husky On-Net VPN.
Non-UW members, see: Connecting to CSDE’s HON-D Departmental VPN
2. Open WinSCP. Choose File Protocol “SFTP.” Enter the server name (e.g. ‘csde-fs1.csde.washington.edu”) in the “Host name:” box. Choose “22” in the “Port number:” box. Enter “netid\” followed by your UW NetID (e.g. “netid\csdecc”) in the “User name:” box. Enter your netid password. Click “Login” to connect to the server.
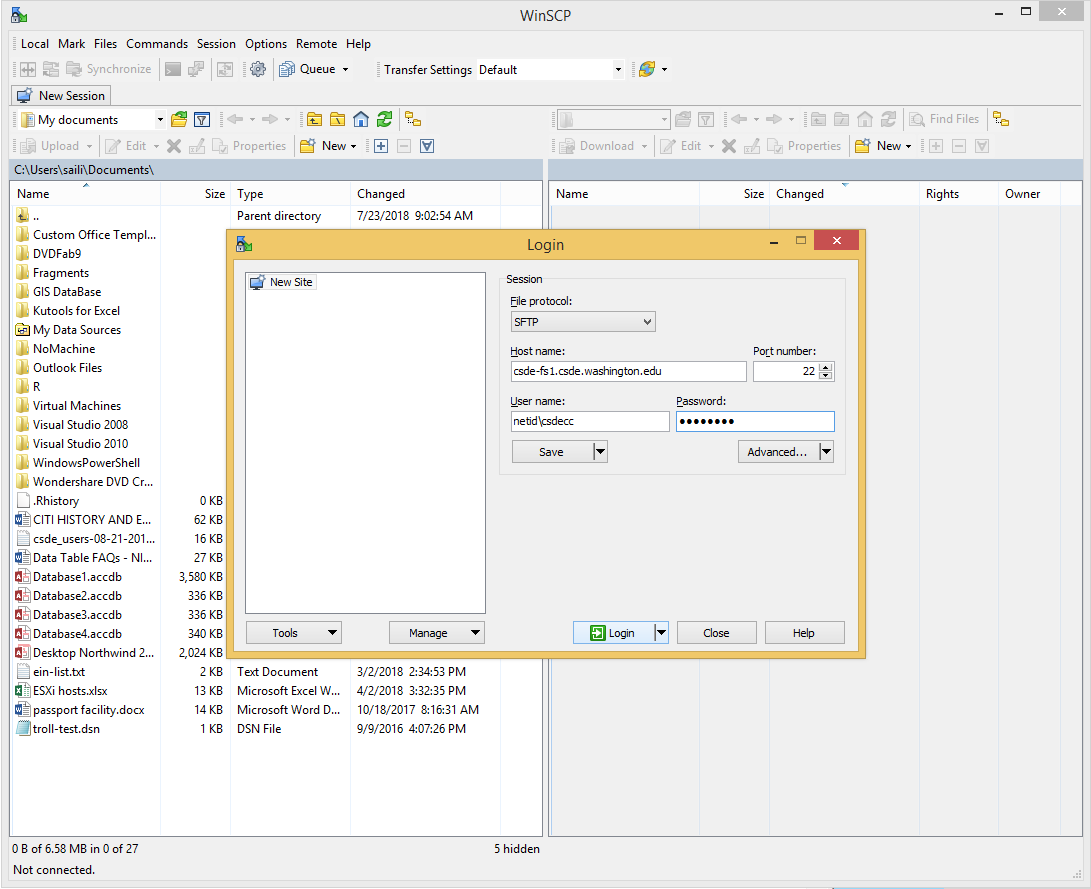
3. If the connection works, the right side of the application should resemble the image below (without the red text).

Connecting with Putty SFTP
Putty is a freeware suite of applications that gives Windows users simple SSH secure connectivity features comparable to those of Unix or Mac OS X. Putty applications are self-contained programs that do not require installation or configuration, making them ideal in situations where software cannot be installed.
To install Putty for first use
1. Visit the download page for Putty SFTP.
2. Under Binaries, select and click psftp.exe.
3. An Opening dialog box prompt will appear. Select “Save File.”
To connect to the file servers
1. As of 01/01/21, off-campus users must connect their local system to the Husky On-Net VPN.
-
- Faculty, staff, and students, see:
-
- Non-UW members, see:
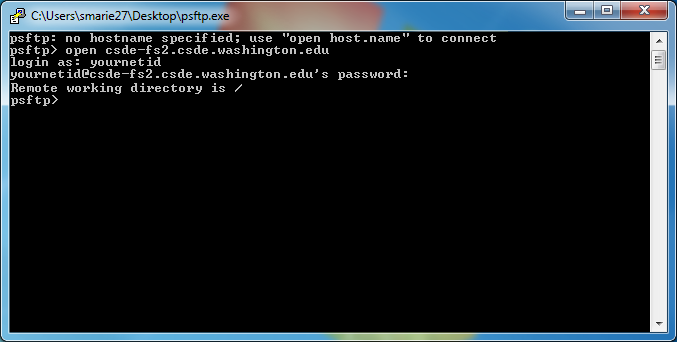
Connecting to CSDE’s HON-D Departmental VPN2. Locate psftp.exe on your computer (likely on desktop or in Downloads folder). The icon will resemble the image below.
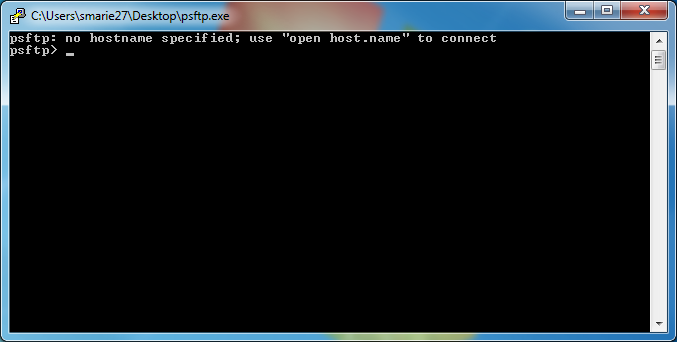
3. Type “open” and then the name of the server to connect to. Press enter to submit.
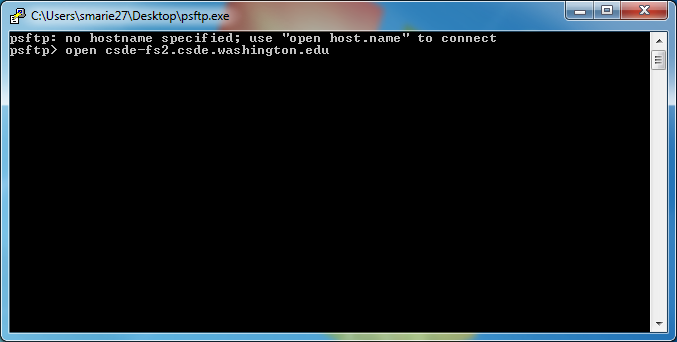
4. If this is the first time connecting, this message should appear: “The server’s host key is not cached in the registry…” Review the message and type “y” then enter to store the key.
5. Log in with UW NetID (in the format “NetID\username”) followed by the NetID password. (Nothing will show as the password is typed; that’s normal.) For help with passwords, contact the CSDE Help Desk.
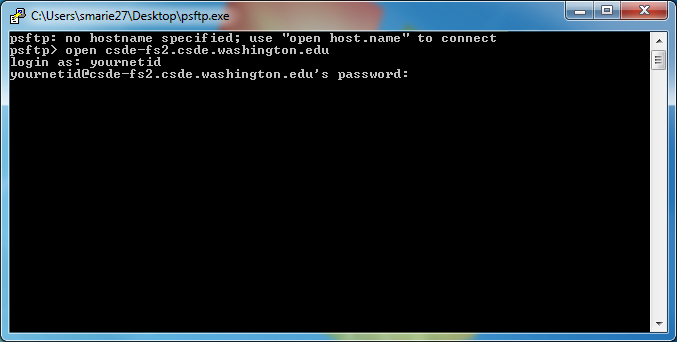
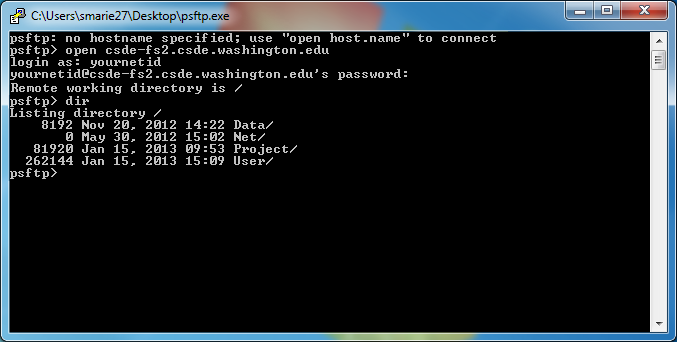
6. Once logged in, your screen should look like the image below.
7. Type “dir” to see a listing of the current directory and verify successful connection.
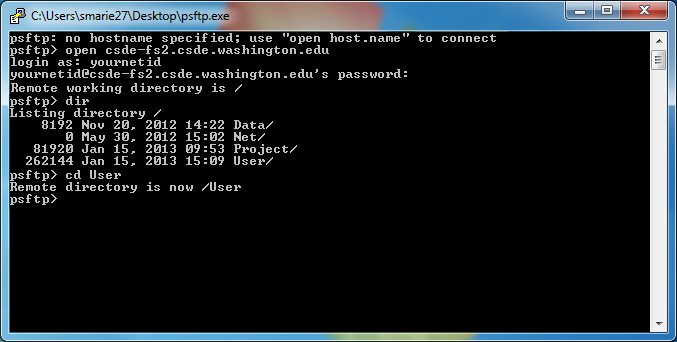
8. To select and navigate to another folder, type “cd” and then the name of the folder. Names are case-sensitive.
9. For a list of additional commands, type help. Official documentation is in Chapter 6 of the Putty User Manual.
If you would like access to your Google Drive account on union.csde.washington.edu, please follow these steps to get started:
- Open Putty, SecureCRT, etc., and connect to union.csde.washington.edu
- ssh union.csde.washington.edu
- Create a directory that will be linked to your Google Drive account (you may name it whatever you wish, i.e., My-Google-Drive)
- mkdir My-Google-Drive
- Enter your newly created directory
- cd My-Google-Drive
- Initialize the directory and provide authentication
- drive init
- This will provide you a URL to navigate to in order to obtain an authorization code. Paste the URL into a web browser and follow its listed steps.
- Once you are provided the authorization code, copy it and return to Union. It should be prompting you to “Paste the authorization code:”. Paste the code and press Enter.
- If it is no longer prompting you for the code, simply enter drive init again and then paste the code.
Your account is linked and all ready to go!
To pull all files from your Google Drive: drive pull
To push local changes to your Google Drive: drive push
You can type drive for a list of other available commands, or you can navigate to the “Google Drive client for the command line” repo to see more detailed documentation.
Connecting to Unix Terminal Servers
Instructions
Download and Connect to Husky OnNet VPN
As of 01/01/21, off-campus users must connect their local system to the Husky On-Net VPN before attempting an x2go connection to Linux systems such as Nori, Libra, and Union.
Non-UW members, see: Connecting to CSDE’s HON-D Departmental VPN
Download and Run the X2Go installation file below.
Download and run the file and follow the instructions. All defaults are fine to use.
NOTE: If your connection is already set up, select the server, click connect, and skip to step 4.
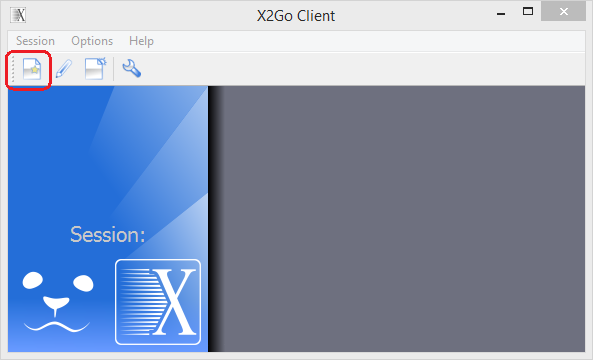
- After installing X2Go Client, locate and run it. You’ll see a window like the one below. After opening X2Go, click New Session.
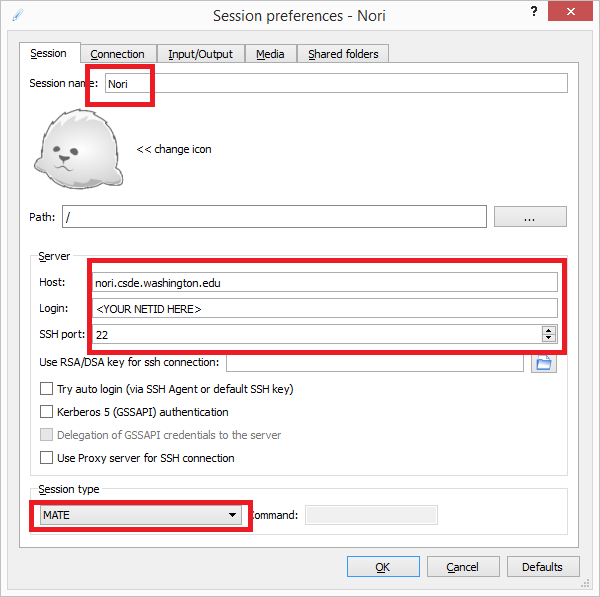
- A window like the one below will appear; fill out the preferences similarly. In our example, we connected to the Nori server (the session name is “Nori,” and the host is “nori.csde.washington.edu”). To log in, use your UW NetID as your username. The SSH port is 22, and the session type is MATE. After filling out the preferences, click OK.
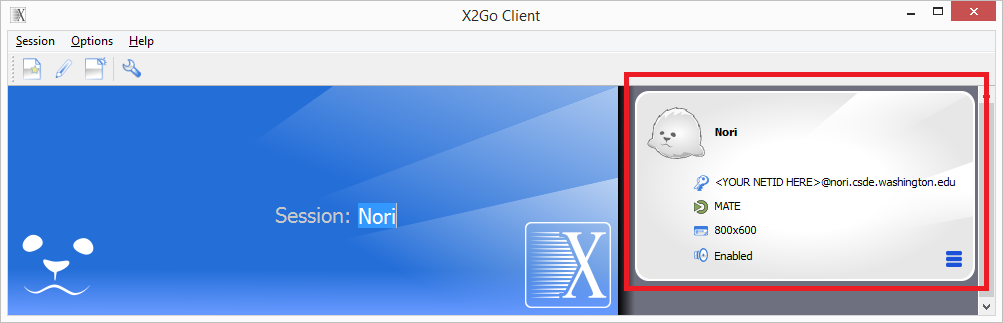
- Now you’ll see the window below. Click on the outlined session box.
- After clicking Connect, ensure you have used your UW NetID credentials. Click OK.
NOTE: At the first connection, the Host Key will be unknown, so the verification will fail. Choose Yes to trust the key. After that, as long as the key doesn’t change, the verification will succeed.
- After logging in, you have successfully connected. Options are located at the top of the screen, as highlighted below. You may log out at any time via System -> Logout.

[/vc_tta_section]
Accessing Linux Home Directory from Another System
The ideal way of moving files to and from Linux is by using the H, T, and R drives. These are easy to map to using directions from above. Then in Linux, use the command winmount. Follow the prompts to mount and be sure to use NetID credentials when asked. You can skip any mount by hitting enter at the password command request. Winmount can be re-run any number of times but will unmount any mounts that arent provided a password.
Connecting to CSDE’s HON-D Departmental VPN
This section only applies to Non-UW members. If you are a current UW Faculty, Staff, or Student you should connect to the regular Husky On-Net linked here
For non-UW members to connect to the CSDE TS and SIM systems, please follow the steps below:
DOWNLOAD HUSKY ONNET VPN CLIENT
Mac users: The VPN client is currently only available for macOS-14 and newer.
- Follow this link to read and agree to the Husky OnNet Terms and Conditions.
- Input your UW NetID and password.
- Download the appropriate client for your operating system.
CONNECT TO THE CSDE VPN NETWORK
- Launch “F5 BIG-IP Edge Client” (if a UW NetID Login Window appears, cancel/ignore it for now)
- Click “Change Server” (Windows) or “Server > Add New Server” (Mac) and enter: https://dept-huskyonnet.uw.edu/csde
- Click “Next” (Windows) or “Verify” (Mac), then
- “Connect” and authenticate with your UWNetID and password.
- Logon to a Windows terminal server session, or launch your web session to Rstudio server or SSH to a CSDE linux system.
Video Examples…
These videos show how to connect to the CSDE VPN network. Note that you must already have the Husky OnNet client installed. Videos do not include audio.