Getting Connected
You will need to install and use Husky OnNet VPN unless your computer is connected via a wired on-campus connection. This will allow you to access resources within the UW network including CSDE Linux machines, Terminal Servers, and Project Folders.
Note on connecting to Husky OnNet: you have the option to select from four different connection types. Unless all of your computer work will be related to UW activities please select the ‘UW Campus Network Traffic Only’ option instead of the “All Internet Traffic” option. If you have a sponsored NETID you will want to connect to the ‘Sponsored’ Husky OnNet connections instead of the normal connections. These are connection number three and four. The URLS for all of the connections are as follows should you ever need to reconfigure your connection (your client should come with these pre-listed):
- UW Campus Network Traffic Only: https://huskyonnet.uw.edu/
- All Internet Traffic: https://huskyonnet-ns.uw.edu/
- UW Campus Network Traffic Only (Sponsored): https://dept-huskyonnet.uw.edu/spon
- All Internet Traffic (Sponsored): https://dept-huskyonnet-ns.uw.edu/spon
How to Install Husky OnNet
Go to the Husky OnNet download page and select your operating system. Then read the terms and conditions and select “I Agree” if you agree to them. You will be taken to a downloads page. Select your system type and click to begin the download. When it is complete, double-click on the package in downloads and install it. It will install under ‘BigIP’ if you search for it in your applications.
When you open it you will be prompted to authenticate with your UW NETID and password and will have multiple connection types to choose from. We recommend UW Network Traffic Only so that only your relevant traffic will be routed through the VPN.
How to Install Husky OnNet
Go to the Husky OnNet download page and select your operating system. Then read the terms and conditions and select “I Agree” if you agree to them. You will be taken to a downloads page. Select your system type and click to begin the download. When it is complete, double-click on the package in downloads and install it. It will install under ‘BigIP’ if you search for it in your applications.
When you open it you will be prompted to authenticate with your UW NETID and password and will have multiple connection types to choose from. We recommend UW Network Traffic Only so that only your relevant traffic will be routed through the VPN.
How to Install Husky OnNet
Go to the Husky OnNet download page and select your operating system. Then read the terms and conditions and select “I Agree” if you agree to them. You will be taken to a downloads page. Select your system type and click to begin the download. When it is complete, double-click on the package in downloads and install it. It will install under ‘BigIP’ if you search for it in your applications.
When you open it you will be prompted to authenticate with your UW NETID and password and will have multiple connection types to choose from. You will need to connect via one of the Husky OnNet Sponsored URLS:
- UW Campus Network Traffic Only: https://dept-huskyonnet.uw.edu/spon
- All Internet Traffic: https://dept-huskyonnet-ns.uw.edu/spon
We recommend UW Network Traffic Only so that only your relevant traffic will be routed through the VPN.
If you are on a Mac, you should be able to select the third or fourth option from the drop down. if you are on windows you may have to select ‘Change Server’ and input the ‘spon’ url of your choice.
File and Project Folder Services
NOTE: CSDE Computing only supports Windows 10 and newer PCs to directly map our network shares. If you are using Windows 8 or below and need to map a CSDE drive, please contact us at csde_help@uw.edu.
Mapping a CSDE drive works best from on campus. It can be done from off campus using Husky OnNet VPN, but this is not suggested as a long-term solution — the drives will give an error message anytime they are unable to make a connection. The preferred off-campus method of reaching files is through Remote Desktop and Windows Terminal Server (see Connecting to Windows Terminal Servers below).
Many campus workstations already have drives mapped automatically. On those that do not, follow the steps below to access them.
Windows
1. Open File Explorer.
a. On Windows 8 and later, it can be found at Start -> (All) Programs -> Windows System -> File Explorer.
2. Open Map Network Drive.
a. On Windows 8 and later, click on This PC in the left navigation pane. Then click on Computer -> Map network drive on the top menu bar.
![[Map Network Drive image]](/wp-content/uploads/2016/08/mapping_netdrive2_1.jpg)
3. Choose a drive Letter from the the drop-down selection.
a. Choose any drive letter; however, to avoid confusion, we suggest CSDE’s standards (H:, R:, and T: or Z:) if possible.
4. In the Folder field, type the path to the resource. Below are the full network paths for the H:, R:, and T: drives. Note that staff and faculty home directories are stored on FS1.
| Drive | Folder |
| H: | \\netid.washington.edu\csde\homes\user1\username (faculty or staff) |
| H: | \\udrive.uw.edu\udrive (for student accounts holders) |
| O: | \\netid.washington.edu\csde\shares\office\csde_office |
| R: | \\netid.washington.edu\csde\net (If you encounter a problem mapping this drive, please contact us at csde_help@uw.edu) |
| T: | \\netid.washington.edu\csde\shares\transfer |
| G: | \\netid.washington.edu\csde\shares\GIS |
5. Click Connect using different credentials. In the box that pops up, type “NetID\” and your UW NetID username. Click OK. NOTE: The Reconnect at sign-in field tells Windows to reconnect to the CSDE drive on login, and it also stores the encrypted NetID password on the computer. If the computer is used by multiple users with the same login credentials, uncheck this box to protect CSDE files from unauthorized access.
![[Connect As image]](/wp-content/uploads/2016/08/mapping_connectas1.jpg)
6. Click Finish to map the network drive using the provided information. If all goes well, the contents of the H: or T: drive will be displayed on the screen. To disconnect the network drive when finished, simply right-click and select Disconnect Network Drive.
![[Disconnect Network Drive image]](/wp-content/uploads/2016/08/mapping_disconnect1_2.jpg)
Mac
1. Click Finder -> Go -> Connect to Server.
2. In the address field, type “smb://” followed by the fully qualified domain name of the file server to connect to. (For example, type “smb://udrive.uw.edu/udrive” to access u-drive directory.)
3. Log in with your NetID username and password (in the format of “NetID\username”).
4. Go to Finder and see “udrive.uw.edu/udrive” under the Shared tab. The drive will be mounted until ejected or until the user logs out.
Here is a list of drive letters and their corresponding server names:
| Drive | Folder |
| H: | netid.washington.edu/csde/homes/user1/username (faculty and staff) |
| H: | udrive.uw.edu/udrive (for student account holders) |
| O: | netid.washington.edu/csde/shares/office/csde_office |
| R: | netid.washington.edu/csde/shares/net |
| T: | netid.washington.edu/csde/shares/transfer |
| G: | netid.washington.edu/csde/shares/GIS |
There are three recommended software options for transferring files via SFTP (ssh-based, port 22, UW VPN connection required).
- WinSCP
An industry standard and favorite. Has install version as well as portable executable. Available for Windows only. - CyberDuck
Another industry standard and favorite. Available for Windows (Download installer) and Mac (via App store). - Putty SFTP
Choose this option if you cannot install software (e.g., if you are using a public computer lab or someone else’s computer). However, this is a command-line tool and lacks a graphical interface. - FileZilla
A free and Open Source SFTP Client
As of 01/01/21, to connect to CSDE file server resources with SFTP, you must first connect to the UW’s VPN service “Husky On Net”.
Non-UW members, see: Connecting to CSDE’s HON-D Departmental VPN
Also, you must know the server and path that correspond to the drive you are using. The table below explains how to reference the server and file paths for various CSDE drives. Also, note the following:
-
- Always connect on Port #22. (SFTP uses the same port number as SSH.)
- The paths to use for SFTP are not the same as those used for mapping the drive.
Username: netid\your_netid (On U-drive, just use netid)
Port: 22
Drive   Host Server to SFTP/connect to      Folder
-----   ----------------------------       -------
H:  sftp.csde.washington.edu            Users\facultyusername or Users\staffusername
H:  sftp.udrive.uw.edu                  studentusername (student account holders)
                                           *do not prefix username with "netid\ "*
H:  sftp.csde.washington.edu            csde-fellows (most CSDE trainees/fellows**)
O:  sftp.csde.washington.edu            Office
R:  sftp.csde.washington.edu            Net (contains Project and Data)
T:  sftp.csde.washington.edu            Transfer
Unix Home Directory:
    union.csde.washington.edu           Unixhome
To use SFTP on a Unix computer use, the sftp command to connect to the server. For more information about using SFTP on Unix, refer to its manual page by typing man sftp. In addition, you may use SFTP to connect to any CSDE Unix server. A list of CSDE Linux Servers.
Connecting with FileZilla
1. As of 01/01/21, off-campus users must connect their local system to the Husky On-Net VPN.
Non-UW members, see: Connecting to CSDE’s HON-D Departmental VPN
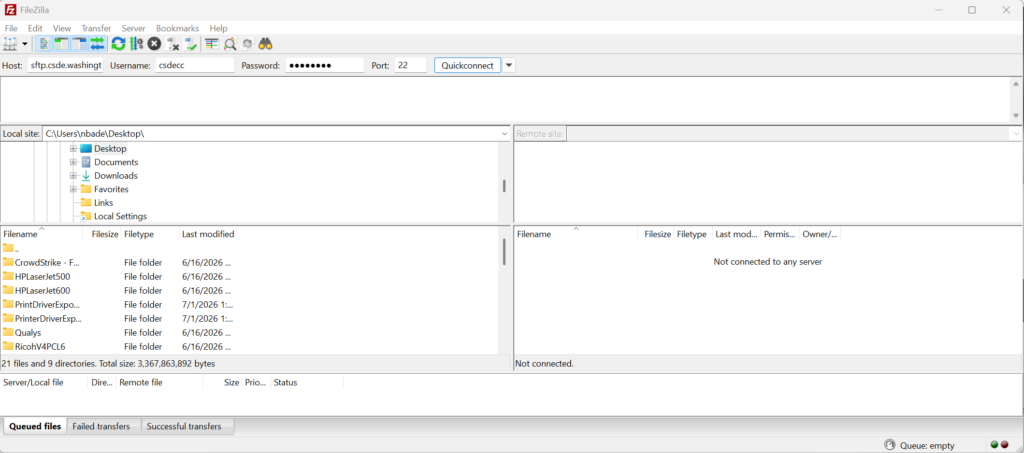
2. Open FileZilla. Choose File Protocol “SFTP.” Enter the server name (e.g. “sftp.csde.washington.edu“) in the “Host name:” box. Choose “22” in the “Port number:” box. Enter your UW NetID (e.g. “csdecc”) in the “User name:” box. Enter your netid password. Click “QuickConnect” to connect to the server.
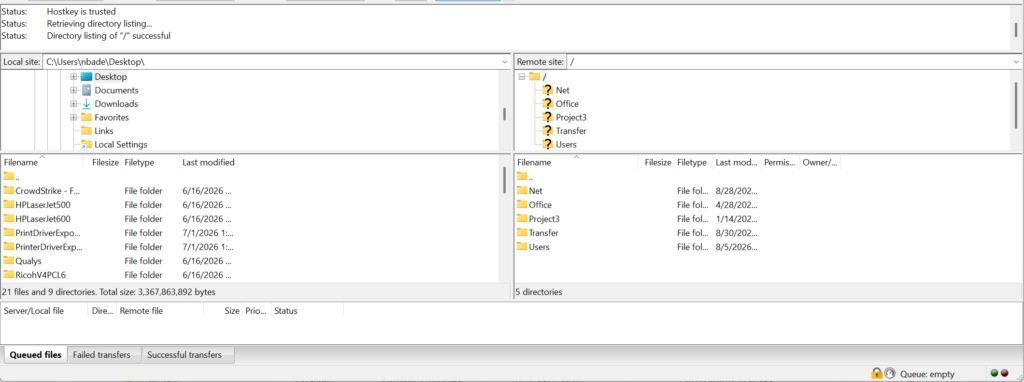
 3. If the connection works, the right side of the application should resemble the image below.
Connecting with Putty SFTP
Putty is a freeware suite of applications that gives Windows users simple SSH secure connectivity features comparable to those of Unix or Mac OS X. Putty applications are self-contained programs that do not require installation or configuration, making them ideal in situations where software cannot be installed.
To install Putty for first use
1. Visit the download page for Putty SFTP.
2. Under Binaries, select and click psftp.exe.
3. An Opening dialog box prompt will appear. Select “Save File.”
To connect to the file servers
1. Off-campus users must connect their local system to the Husky On-Net VPN.
- Faculty, staff, and students, see: Set up Husky On-Net VPN.
- Non-UW members, see: Connecting to CSDE’s HON-D Departmental VPN
2. Locate psftp.exe on your computer (likely on desktop or in Downloads folder).
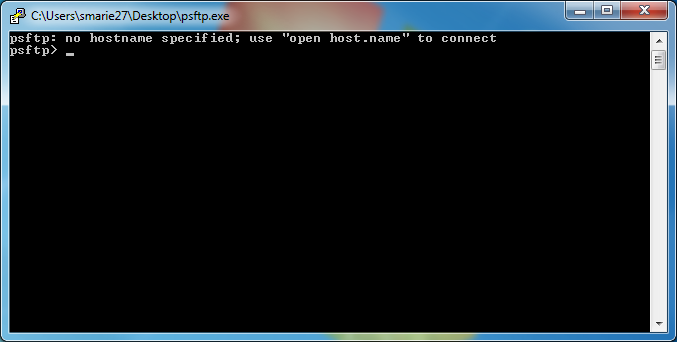
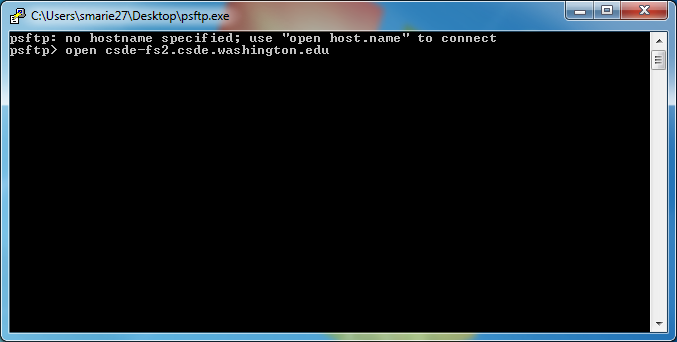
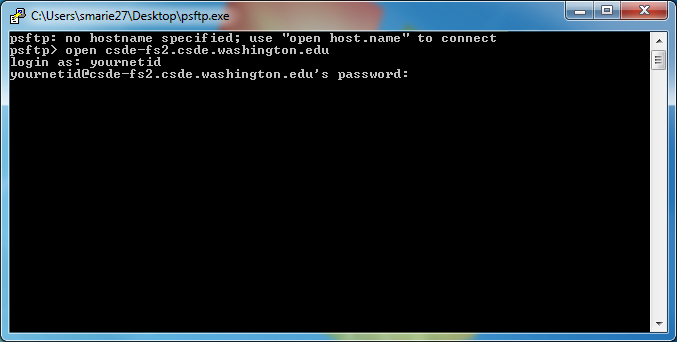
3. Type “open” and then the name of the server to connect to: sftp.csde.washington.edu. Press enter to submit.
4. If this is the first time connecting, this message should appear: “The server’s host key is not cached in the registry…” Review the message and type “y” then enter to store the key.
5. Log in with UW NetID (in the format “NetID\username”) followed by the NetID password. (Nothing will show as the password is typed; that’s normal.) For help with passwords, contact the CSDE Help Desk.
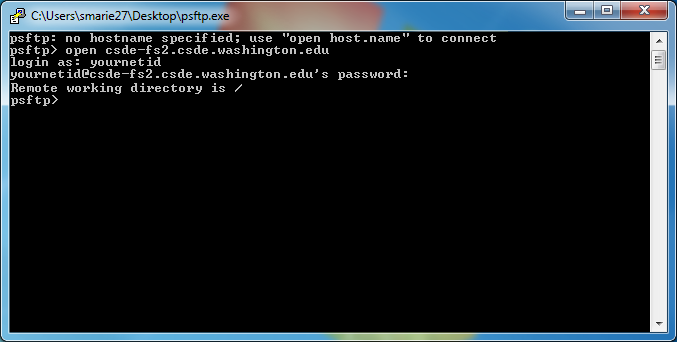
6. Once logged in, your screen should look like the image below.
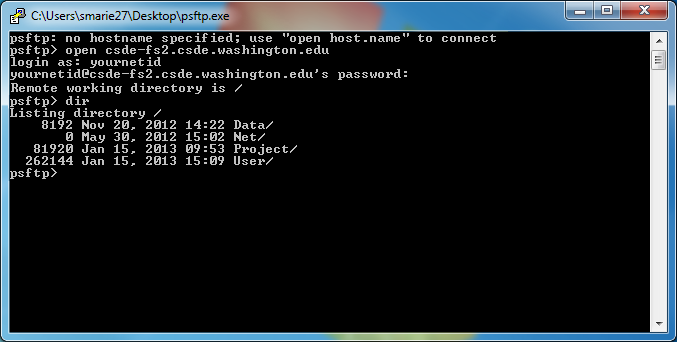
7. Type “dir” to see a listing of the current directory and verify successful connection.
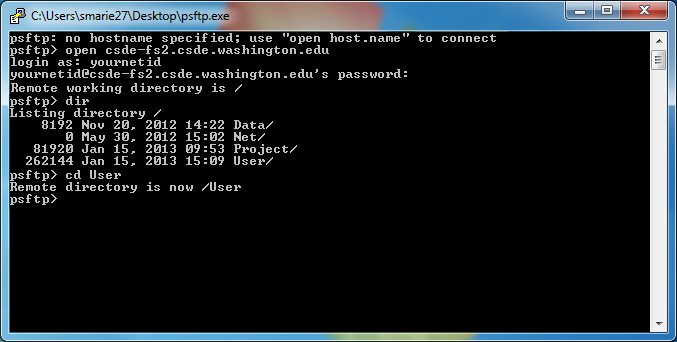
8. To select and navigate to another folder, type “cd” and then the name of the folder. Names are case-sensitive.
9. For a list of additional commands, type help. Official documentation is in Chapter 6 of the Putty User Manual.
Project Folders
On the CSDE servers, you can apply for a Project Folder where you can store data in a location that is easily accessible when you are online.
Please be aware that to be granted use of a project folder, you must be working with a group of at least 2 members. Additionally, try to name your Project Folder as specifically and uniquely as possible, in order to avoid overlap with other existing project folders.
When a project folder is inactive for a long period of time, it will be moved into an inactive folder, where it will need a project folder member to notify csde_help@uw.edu to reactivate it. Should a folder be inactive for too long, it will be deleted altogether. Please endeavor to either move all necessary content off of the folder, or let us know to reactivate it in a timely manner to avoid loss of project data.
Additionally, please note that you should keep the data in the project folder within a reasonable size, so that the storage drive is not overloaded.
Terminal Servers (Windows)
Remote Access Windows Computing (Terminal Servers)
CSDE maintains Microsoft Windows Servers for general use computing through remote access. These permit anyone with a CSDE Windows Network account to sign into our file servers, access datasets, and run statistical software from anywhere in the world on a familiar Windows desktop environment.
If you don’t yet have one, please request a CSDE Computing Account.
The Terminal Servers are rebooted every Thursday night/Friday morning from 3:00 AM to 5:30 AM PST while we apply updates. They will not be available during this time.
Additionally, please save any working files you have to your H: Drive when working on the Terminal Servers to ensure data accessibility.
See here for a complete tutorial on accessing the CSDE Windows terminal servers, including links for download and use of Husky OnNet.
There are currently four general-purpose CSDE Windows terminal servers available:
For student users only:
- csde-ts4.csde.washington.edu
- csde-ts5.csde.washington.edu
For faculty/staff/off-site users:
- csde-ts1.csde.washington.edu
- csde-ts2.csde.washington.edu
Using servers csde-TS4.csde.washington.edu and csde-TS5.csde.washington.edu is slightly different than using servers TS1/2…
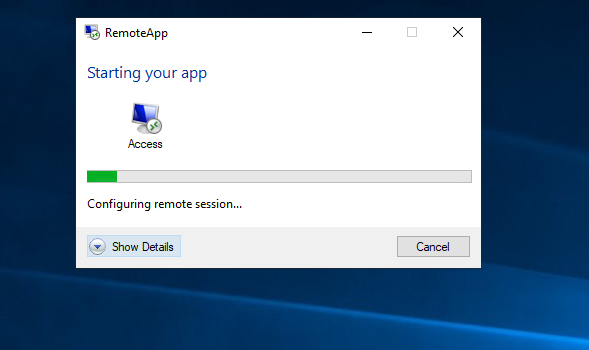
All available applications can be found by opening the folder “Applications” on the desktop. To launch an application, simply click on the shortcut icon (e.g. SPSS 23). After clicking the shortcut icon, you will see a little pop-up window like like the following image.
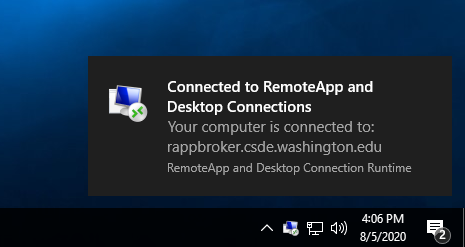
At the same time, a small window will also appear at the lower right-hand corner of the desktop windows
After a couple of minutes, you should be able to see the application window opens on the screen.
**** Please notice that the first time you click and launch an application, it may take a bit longer. Please be patient, the time to open will improve after that. If an application is not launched after you double click, please double click it again to relaunch it. Another trick is to click on another application shortcut which will speed up the appearance of the program. ****
You can also launch an application by clicking the “Start” button at the lower left-hand corner and look for the application on the list of Programs.
**** If your program is stuck or frozen, you can terminate it by using Task Manager. To do that click “Start” at the lower left-hand corner and look for the application “Task Manager (remote)” to launch. When Task Manager window is open, search the frozen application under the “User” tab to end the task. ****
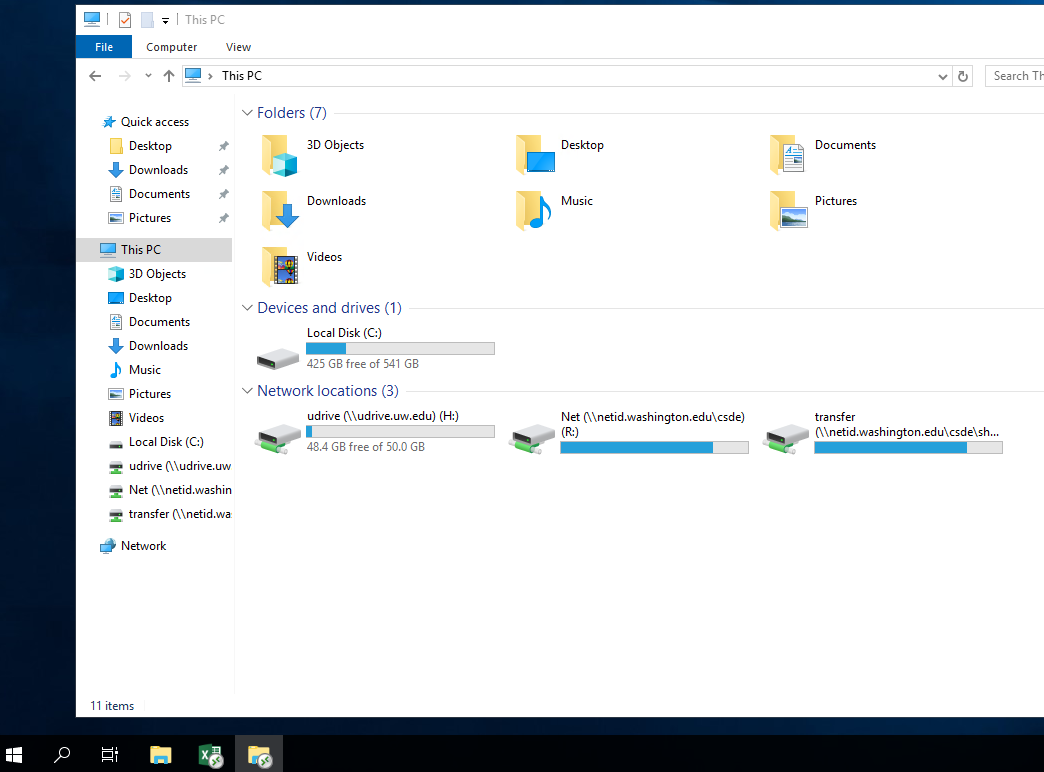
To look for files in your H: R: and T: drives, you must first click to open the shortcut icon “This PC” on the desktop of your remote desktop session window. Please be aware that this is the best possible way to locate your files.
To avoid any unnecessary loss of data, please make sure to save your work frequently and do not leave work unsaved if you disconnect from the remote desktop server.
Users should always save their files on their H: drive which is the same as their UW UDrive. The server is setup to redirect Documents folder, Downloads folder, as well as the Desktop to be included in the user’s UW UDrive.
The following image shows what you will see when you click on the “This PC” shortcut icon. Notice that the icons on the taskbar look slightly different than normal icons since they are programs running on a remote server.
These servers carry a full complement of ready-to-use statistical and social-sciences software packages. The terminal servers have nearly identical software packages installed and provide access to all your personal and project files. All our servers are Dell R6525 PowerEdge servers running Microsoft Windows Server 2022 Operating System. Each has Dual 48-core AMD 7413 processors with more than 1TB of system memory.
Please send your questions to csde_help@uw.edu
There are five drives available for use on CSDE terminal servers. Once logged onto a terminal server, they can be found in the My Computer menu.
| Windows Drive Letter | Use for | Backed Up | Private | Shareable with others |
| H: | The H: drive is your home directory, where personal files can be saved. It can only be accessed by you and is backed up regularly. |
 |
|
|
| O: | The O: drive is for CSDE administrative documents and is only available to CSDE personnel. |
|
|
|
| R: | The R: drive is for storage of project and data sets. Multiple users working on the same project can have read/write access to files/folders. |
|
|
|
| T: | The T: drive is used for temporary storage and file sharing. T: is not backed up, so save copies elsewhere. |
|
||
| U: | The U: drive is used for personal file storage. It can only be accessed by you and is backed up regularly. It can be self-service restored following these UW-IT directions
The U: drive is the same as your UW UDrive. |
|
|
Be careful not to permanently store data on the desktop, in the C: drive, or in the Downloads folder. These locations are regularly cleared of files to free up space, so any files lost may be impossible to recover.
Normally, one has to be on campus to view the electronic resources offered by UW Libraries. However, CSDE allows remote access through CSDE’s “Windows Terminal Server,” which all CSDE Affiliates are invited to use. Once you are logged into the server, it allows you to search the UW Libraries systems and use their resources as if you were on campus.
To find a journal article in the UW database, follow the steps below.
- Sign into the terminal server using your CSDE account
- Open a web browser and go to www.lib.washington.edu/
- Enter the journal title into the search box at “UW WorldCat: Search UW Libraries and beyond” on the library homepage
- Journal availability information will be displayed. Use whichever database you would like. You can then search the database for your articles by title/author/keyword/issue/etc.
CSDE computer users may request a CSDE project folder in the R: drive to share data with other users by filling out our Project Folder Request form. We do our best to set up the folder that same day but sometimes it may take longer or we may need to get more information from the requesting user.
This project folder will reside on a CSDE network file server and will therefore be backed up daily. In addition, we’ll configure it in such a way that only the members of your group have access to the folder.
Please note that users must request a folder inside of the R: drive in order to begin storing files. Any unauthorized files that are stored inside of the R: drive may be deleted without advanced notice. Also, project folders must be requested with at least 2 members. We do not allow a project folder to be created for just a single user.
Users may not change permissions or inheritance to their project folders; this includes granting access to another user.
If you would like to grant access to someone, email csde_help @u.washington.edu, including the project folder name and the usernames you would like to add. In the event that the requested user lacks a CSDE account, we will ask that they first apply for an account online.
SIM Cluster
Simulation Cluster
CSDE’s Simulation Cluster is a group of 2 Dell C6320 PowerEdge Windows Server 2025 servers featuring simulation-specific software intended for computationally intensive work. The Sim Cluster is available for use by CSDE affiliates and students from all CSDE training program partner departments.
To start using the the Simulation Clusters, you must first submit a request to gain access.
The Sim Cluster is rebooted on the last Friday of each month and is therefore offline from 3:00 AM to 10:00 AM PST while we apply updates. Please plan your work accordingly.
- All off-campus users must connect their local system to the Husky On-Net VPN.
Faculty, staff, and students, see: Set up Husky On-Net VPN.
Non-UW members, see: Connecting to CSDE’s HON-D Departmental VPN - Connect to either of the two Sim Cluster nodes (e.g., sim1.csde.washington.edu or sim2.csde.washington.edu) using Remote Desktop Connection.
- Log in with your NetID username and password.
To start a new session for an additional simulation job, simply open another Remote Desktop Connection window to a different sim node (e.g., sim2.csde.washington.edu).
 To resume a job that’s currently running, reconnect to it by logging back in directly to its node. (The My Computer icon on your session’s desktop will indicate which cluster node you’re using; see the image to the right.) For example, if you disconnect from SIM2, your session would continue running there. To reenter and check the status of jobs, you need to use Remote Desktop Connection to connect back to the Sim node with your job.
- List of programs available on CSDE Sim cluster
- Each cluster node is a Dell PowerEdge M640 or C6320 Blade server with 16 2.00GHz Intel Xeon CPUs and 384GB or more RAM. They run Windows Server 2025 (64-bit) DataCenter Edition.
- Information on the H: and R: drives is backed up to tape, but like the Terminal servers, files on the Desktop and C: drive of the Sim Cluster are not backed up. The Desktop and C: drive are wiped whenever the sim nodes are re-imaged, so make sure you store important data elsewhere. Though we will do our best to minimize disruptions, CSDE is not responsible for data lost due to maintenance reboots or unexpected crashes.
- Understand that the Sim nodes are a limited, shared resource
- Sim nodes are meant to be used primarily for long running jobs
- You are expected to compose a brief note and endorsement for future funding proposals.
- Do not overload the cluster with too many computationally intensive jobs—it prevents others from using the resource.
- If running multiple jobs, dont consume all the resources of a node – balance your work across the nodes and leave capacity for other users.
- Report any problems or slowdowns on the sim nodes to csde_help@uw.edu.
Linux Systems
Linux Systems
Linux systems are characterized by various concepts: the use of plain text for storing data, a hierarchical file system, treatment of devices and certain types of inter-process communication (IPC) as files, and the use of a large number of small programs that can be strung together through a command line interpreter using pipes (as opposed to using a single monolithic program that includes all of the same functionality).
Getting an Account
You must have a CSDE Unix account to use the CSDE Linux systems. The following people qualify for Unix accounts at CSDE:
- Current faculty affiliates
- Current UW students who contribute to the Student Technology Fee
- Off-campus population scientists sponsored by a CSDE faculty affiliate
The parties above may request an account by completing this form.
Getting a UWNetID
If you’re an offsite or new UW member without a UWNETID, or wish to sponsor a UWNetID for a visiting researcher, click here
If you already have a UWNETID, manage your UW services at the UWNetID management pages here.
All CSDE Unix systems allow incoming connections exclusively via Secure Shell (SSH) v2.
Connect to Husky OnNet VPN
All off-campus users must connect their local system to the Husky On-Net VPN before attempting a ssh or Rstudio connection to Linux systems such as Nori, Libra, and Union.
-
- Faculty, staff, and students, see:
-
- Non-UW members, see:
Connecting to CSDE’s HON-D Departmental VPN
From Windows
- Several free Secure Shell 2 clients are available for windows:PuTTY and
mRemoteNG
UW Device licensed SecureCRT - Directions for connecting via a graphical desktop are on the tutorial section Using X2Go
From Unix
- This is accomplished via the command line Secure Shell (SSH) client.
- Syntax: ssh <user@hostname>
- Example: “ssh dth2@nori.csde.washington.edu”
CSDE Unix Hosts
The following systems are available to all CSDE Unix Account holders
| Host: | Model Name: | cpu MHz: | CPU Cores: | MemTotal: | SwapTotal: |
| nori.csde.washington.edu | Dell PowerEdge R630 | 2.53 Ghz | 16 | 500 Gig | 10 Gig |
| libra.csde.washington.edu | Dell PowerEdge R630 | 2.53 Ghz | 16 | 500 Gig | 10 Gig |
| union.csde.washington.edu | Dell PowerEdge R630 | 2.53 Ghz | 16 | 500 Gig | 10 Gig |
RStudio Workbench Professional
To access RStudio Workbench Professional via a web browser you must have an active CSDE Unix account. Once established, you may use a browser such as Chrome, Safari, or Firefox and simply open up your browser and navigate to any of the systems below. For more information see: Rstudio Server web site
- https://union.csde.washington.edu:8787
- https://libra.csde.washington.edu:8787
- https://nori.csde.washington.edu:8787
Note that you should only have one instance of Rstudio Workbench running on any given system at a time.
You can not run simultaneous sessions of RStudio Workbench Professional on two or more servers simultaneously.
If you need to run multiple R jobs at the same time on more than one of these systems, use the linux command line to run “R”
You may also use one or more Hyak nodes to do this as well.
More information and instructions can be found for Unix programs, such as X2Go, on our “Connecting to Unix Terminal Servers” section of our tutorials page.
CSDE offers Ubuntu 22.04 Linux servers with software specialized for demographic research and statistics. The machines are available to all CSDE Unix account holders.
General-Access Unix Systems
Everyone with a CSDE Unix account may access union.csde.washington.edu and libra.csde.washington.edu. Both have the following system specifications:
- 64-bit, x86-64, 6.x kernel
- Ubuntu 22.04 (Jammy)
- X2Go capable
- Model: Dell PowerEdge R630
- CPU: 2x Intel(R) Xeon(R) CPU E5-2630L v3 @ 1.80GHz
- Total CPU Cores: 32 with Hyperthreading
- Memory Total: 520 GB
- Swap Total: 20 GB
The following software is available on the General-Accesss (GA) CSDE Linux Servers:
Other UW Computing Resources of Interest
CSDE on GitHub
CSDE has an account on GitHub, an easy-to-use, web-based, software-development tool for software and documentation version control and sharing. CSDE Affiliates have used this public code repository for sharing code and data for classes, workshops, and collaborative efforts with the public and other universities. (You can learn more about GitHub here.) You may request access to the CSDE GitHub repository by emailing csde_help@uw.edu and including the email address you registered with GitHub (if you already have an account there).
Additional Information about using and securing repositories on github are listed below:
UW Github service (via UW-IT Service catalog entry)
Securing GitHub Repositories Part 1
Securing-GitHub-Repositories-Part-2
Anthro Data Science: Github for Anthropologists
High-performance computing is handled by the CSDE pool in Hyak, the UW-Wide High Performance Computing cluster. All Hyak access is authenticated by UW NetID and requires two-factor authentication via “DUO”.
If you are a UW student, you are strongly advised to join the UW HPC club and access the larger STF Hyak pool. (You can still connect from the CSDE Unix systems to Hyak if you are working with a CSDE affiliate that owns a Hyak node.)
To use the CSDE Hyak nodes (Klone is the current generation, as of 4/2021), all of the following are required:
- CSDE Computing admins must add your UW NetID to the group “u_hyak_csde” to enable access. Request Hyak access from csde_help@u.washington.edu.
- You need to have DUO two-factor enrollment enabled on your UWNETID. CSDE Help must do this on your behalf if you are not a current UW member. If you are a current UW member you can enroll your device yourself
- You must enroll a compatible two factor device in the UW Duo system.
Connecting to Hyak
You’ll need to SSH into Hyak using your UW NetID username and password. It will ask you to approve using DUO 2-factor. Depending on which cluster you want, use the hostname:
- Klone.hyak.uw.edu 2021+ version of cluster
For example, ssh UWNetID@klone.hyak.uw.edu, substituting your user name in place of “UWNetID.” Please use the /gscratch/csde area and create a subdirectory there named with your UW NetID. The lolo collaboration file system is located at /lolo/collaboration/hyak/csde/.
Please subscribe to this list for Hyak status updates.
The basic gist of the Hyak cluster is this: you will SSH into the head node of the Hyak system, where you can do minor work or ask the system for an “interactive node” you can ssh directly to and work away. The “intended” way to use the cluster is to make a batch submit script and submit your job to the scheduler. Once you set up your SSH key relationship, you won’t need to use your DUO 2FA login. In a standard Hyak node on the batch system, all software is a “module,” so you’ll have to load the “R” or “Microsoft R open” (Formerly RevolutionR) module. Take a look at “Software Development Tools” here.
Visit the HYAK website for more documentation:
Getting started documentation for Hyak
Questions? E-mail help@uw.edu with “hyak” in the subject.
Which Hyak Queue should I use?
NOTE: THIS INFORMATION MAY BE OUT OF DATE – CONTACT Hyak help above if you have issues with what is shown below.
Have a lot of parallel workloads to run? Using the backfill queue offers the working potential of thousands of CPU cores.
NOTE: Each job in the backfill queue can only run for ~2 hours before being shut down, so divide your jobs up accordingly and/or use “checkpointing”!
As a member of the CSDE hyak allocation, you have access the whichever nodes that CSDE owns as well as the backfill queue.
CSDE strongly advises you to develop and use BACKFILL QUEUE whenever possible.
Run your job on any of 3 queues using the following syntax:
- STF queue: (UW students only)* qsub -W group_list=hyak-stf runsim.sh
- CSDE queue: qsub -W group_list=hyak-stf runsim.sh
- Backfill queue: qsub -W group_list=bf runsim.sh
*If you are a currently enrolled UW student paying the Student Technology Fee, you should join the UW HPC Club. This will allow you to submit jobs to be run in the student node allocation
Citation in Publications
Please remember to acknowledge Hyak in any media featuring results that Hyak helped generate. When citing Hyak, please use the following language:
“This work was facilitated through the use of advanced computational, storage, and networking infrastructure provided by the Hyak supercomputer system at the University of Washington.”
When you cite Hyak, please let us know by emailing help@uw.edu with “Hyak” as the first word in the subject along with a citation we can use in the body of the message. Likewise, please let us know of successful funding proposals and research collaborations to which Hyak contributed.
Hyak nodes provided by CSDE is also considered CSDE resource, so remember to also cite CSDE as well! see:
here for more information on acknowledging support from CSDE.
Kopah is the University of Washington’s on-premises, S3-compatible object storage service. It offers flexible, cost-effective, and scalable storage.
Additional Hosting
CSDE also hosts grant-funded project servers, websites, and databases on its secure server. We host Windows Terminal Servers equipped for managing sensitive data and file-backup services. Affiliates can access these services with a yearly fee or ongoing grant funding support. Contact Matt Weatherford for further details.