This page is for CSDE Affiliates and CSDE staff who need to create (sponsor) NetIDs or provision services for people they are working with.
Creating a Sponsored NetID
- First, confirm that the person you are creating the account for does not already have a NetID.
- Go to https://uwnetid.washington.edu/sponsor/, read the full statement, and then click “I agree”
- Fill out first name, last name, email address, and the reason for sponsorship. Note that the reason for sponsorship will end up in an email to the person you are sponsoring.
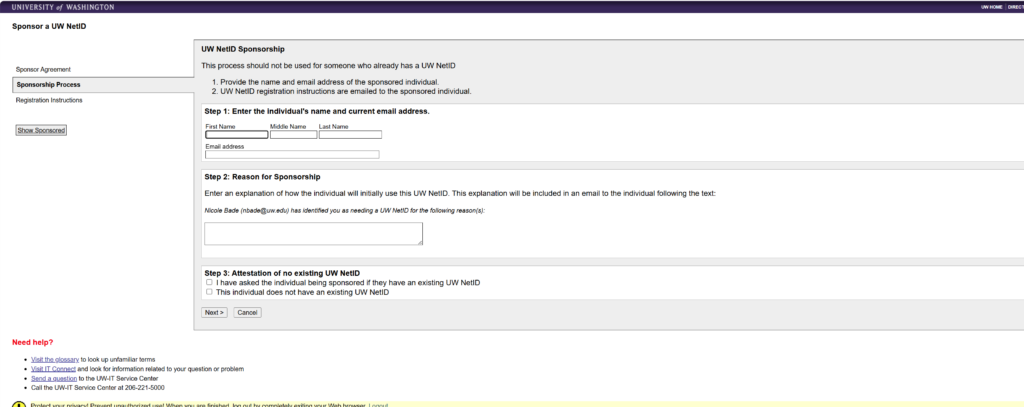
- Click the checkboxes (assuming they are correct) that you have asked if the person already has a NetID and they do not.
- Click ‘Next’
- You will be taken to a page with the sample email
- Click ‘Add Sponsorship’ at the bottom of the page to continue.
- You will be asked if you want to create other NetID’s or if this is the only one. Select whichever is true.
- Log out when you’re done if you are not automatically logged out.
An email will be automatically sent to the person you created the account for asking them to log in and fill out some information such as a recovery email. They may also be asked to configure two factor authentication which will involve the installation of an app or the ability to receive a phone call.
Provisioning (Husky OnNet) and Other Services
When you’re done, the person you’ve just initiated a Create NetID process for will have to pick their NetID. Once they have done that (you may have to ask them to tell you what it is) you’ll need to provision Husky OnNet access to their account. This is necessary because our servers are not accessible from off-campus, so people need to log into VPN in order to access them. To do this you’ll use the Provisioning Tool:
- Log into https://provision.uw.edu/
- You will see your own account and a list of accounts you have sponsored.
- If you do not see the account you would like to provision, select “Add UW NetIDs to provision”, usually in the middle of the page or at the bottom depending on how many NetID’s are already in your account. If in doubt you can find using CTRL-F and search for “Add UW NetIDs to provision”.
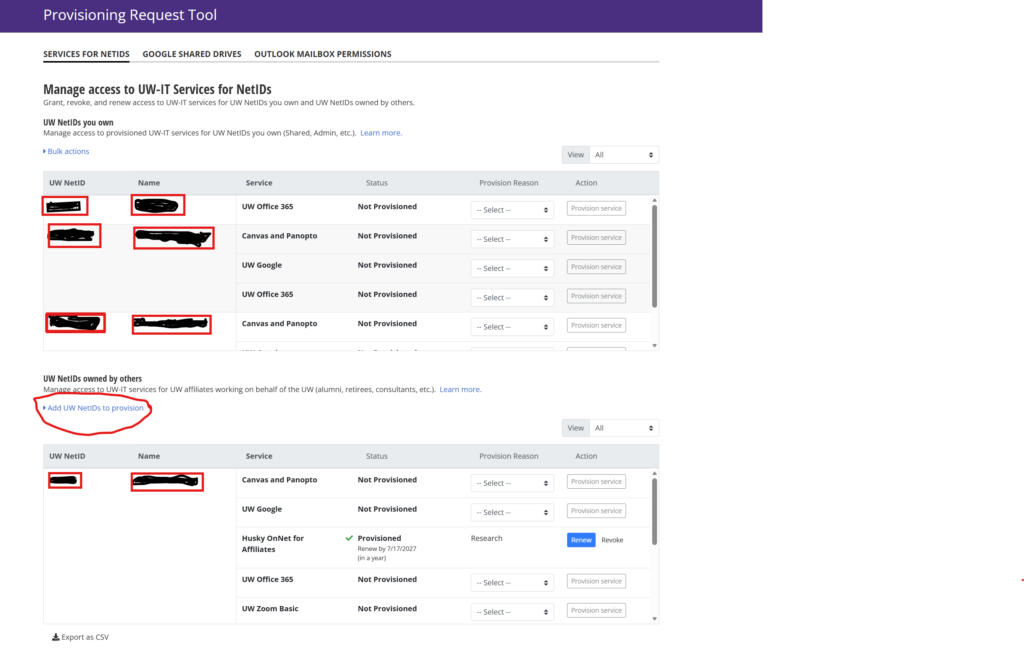
- Once you’ve clicked “Add UW NetIDs to provision”, enter the NetID you would like to provision and the account should appear under the table of NetIDs whose accounts you can provision towards the bottom of the page.
- You will see a table with a NetID and available services. Under the NetID you would like to provision, find “Husky OnNet” and select “provision service”. You will be asked what the service will be used for and you will be prompted to read and agree to some terms and conditions.
- If you would additionally like to configure mail, either Gmail or Outlook for this NetID, then find that service under the NetID and select ‘provision service’.
For more information on provisioning services see https://uwconnect.uw.edu/it?id=kb_article_view&sysparm_article=KB0034450. Remember that you can add an account to provision at the very bottom of the provisioning tool, if needed.